Pages

Thursday, April 12, 2012

Dandelions Canvas Painting: Make a Wish

Used: Acrylic Paint and Canvas board


Whenever I see dandelions I think of wishes.  Closing your eyes, making a wish, and seeing the dandelion seeds float away feels like your sending your wish to someone. Adventually it will touch someone and your wish will be heard.


Next time your outside close your eyes, enjoy the breeze and make a wish. Maybe you'll touch someone. ^.^

Wednesday, April 11, 2012

DIY Neon Yellow Little Owls slip ons.


So it pouring rain here so to get myself in the summer mood and more cheerful I bought these SUPER bright yellow slip ons at target. For the first time I realized that I could fit into a kids size. So I got a little excited and started trying all these kids shoes, I felt a little silly and felt like people were staring, even though I know no one cares…Annnyways lets get started.


Just grab a pair of your favor canvas sneakers,  fabric markers and that’s it! Simple right. So lately I've seen lot of cute owl designs and want to create a simple version of my own, but when I finished and wore them EVERYONE thought there little cats. :( But its okay because they look like little owls to me. 

So grabs some shoes and get started on your own! Enjoy! :)

Monday, April 9, 2012

My Little Garden


PURPLE CAULIFLOWER: YUMMY^o^


TRICOLOR CHRYSANTHEMUMS


Other RANDOM flowers:


SUCCULENT FLOWERS: Interesting tower a mini yellow flowers. 
BLEEDING HEARTS: Very Cute and unique, everyone should consider adding this to their garden


YELLOW SNAP DRAGONS : The really cool thing about this is the really do look like little dragons when you push the petals down ^-^ (Which really amused me) ^-^
ALOE FLOWERS: Very vibrant. They always bring the humming birds.


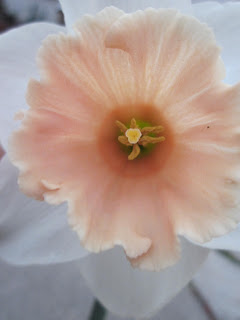
 SRING IS HERE *YEAH* This little daffodils are my favorite with a little pink/orange hue.


LETTUCE, ARUGULA, AND SPINACH! :) However, the weather has tricked my Arugulas into blooming. Guess I'll have to try again next time.


This is my MANDRIN KUMQUAT. I initially wanted a regular Kumquat tree but when I went to the nursery we grab this one and found out we go 20% off and were super excited. ^o^ Then when we went to repot it we finally looked and the tag and realize what we bought. O.o LOL. Still very nice and fragrant with fairly larger fruits, but not as sweet. 


AND Saving the best for last MR. SUNFLOWER. Theres a funny story behind this one. During the summer we planted these in pots and transplanted them and they didn't do so well, so we removed them at the end of the season. Unknowably dropping the seeds on the ground. In the middle of fall there a seedling popping out and we create a barrier to protect it thinking it was something precious that we planted (such and something ediable). As it get bigger I look at it and realize it the sun flowers!!! But since we had nothing new to plant we left it there and it grew into this huge thing. Since the wasn't in season it face the house instead of the street and my friend called it the "EMO SUNFLOWER". Who would of known that the sunflower could get this big in the winter...


Sunday, April 8, 2012

Cherry Blossom

It's my very first painting so don't laugh. I experimented with a bunch of colors and the background changed from yellow, red, orange, to pink, green and blue and this is what happened. I really wanted it to be a sunset background but it didn't quite make the cherry blossom stand out so I used a darker shade.


You should try picking up some paints and see what you end up with, even if you don't like your painting like myself...if feels really good to paint. I was actually going for a more realistic flower with water drops but I just couldn't get that result. BUT it okay. I still like it in the end. Get started on your own and see what you end up painting :)

Monday, February 6, 2012

DIY Shoes: Piano City Lights –Vans

Materials:

Old/New Canvas slip ons
Pencil 
Ruler or straight edge
Fabric Paint 3D (I call it puffy paint)


My parents are from Hong Kong so they used to take me back there every Christmas break. (Yeah and skip school for two months! Bad, I know…) Each time we would go to the peak or the harbor and see the city lights and since its was Christmas it was always super festive. I love it there. Thats how I decided the city I was going to use. Another obsession I have is with piano keys, no I don't know how to play a piano, but that doesn't mean it can't love it…right? Lol. Anyway when I was in college one of my roommate got me into skateboarding and I wanted to design the skate board with piano keys on the bottom with city lights on top (Can you imagine it?! It look so cool in my head), but I never got around to actually buying a skate board. These aren't as cool as I imagine (They look better far away) but the design came from that idea. So let get started.


I always pre draw everything with pencil in case I mess up. Sectioned off the piano area and drew the city lights on top, while the other shoes I left for scribbles and music notes. 


Give it a try. You'll be surprise at what you can do. There a piece of creativity in all of us. Have fun =D

DIY Shoes: Cute Doodle Vans

Materials:
Pencil
Sharpie Markers or Fabric markers
Mod Podge (Use as a sealant)
Old/New Blank White shoes


The style I choose was very versatile (well to me at least), I love wearing them with shirts, pants, leggings, leg warmers, etc. and they are suuuper comfy I forget I have shoes on my feet! I thought they were a little plain…so I decided to doodle all over them. Let's get started!!! ^.^ <3


I went with some cute faces on all kinds of edible items and this is what I came out with. I have this obsession with asymmetrical things when worn in motion. No matter who is looking at you they will see something different, and that is what I was going for. 


 Outer Right Shoe


Inner Right Shoe
But of course if you really have to have matching shoes, just replicate your doodles on the other side. I stuck with black for all my designs and use hot pink for the cheeks on the faces, finally finishing off with a light red boarder. Once your finished with all you doodles then seal it with mod podge. 


I just went for a clear matte finish, but there are all kinds of mod podge (glow in the dark, sparkle, shine, etc –Your preference).Let dry overnight. And your finished! So grab some shoes and express yourself. Any thing goes! <3


DIY: Winter Wonderland Flats

Materials Used:
Flats (In sparkle glitter)
Ribbon (In light orchid)
Snowflake embellishments
Modpodge (you can always use hot glue gun, super glue, etc- depends on preference)
Scissors
Paint brush
Paper towel (for glue clean up)

It's winter time and the holiday season is back! I saw these glitter flats and instantly thought of winter wonderland.

All the materials. Before and after flats.


Lets get started! This is super easy and quick...all the time comes from the drying time.

1. Take your flats and place the ribbon around the areas you would like the ribbon to be (Make sure you make it a little longer and leave yourself some leeway) .

2. Cut. [6 strands: 4 for the criss cross section + 2 for the bows- I suggest to make these a little longer so it easier to tie your bow]

3. Using 2 pieces of the ribbon tie a bow.

3. Glue

4. Let dry (depending on the material you use it will be different). I usually wait overnight to be on the safe side.

5. Trim excess ribbons.

6. Finished


Experiment with your embellishments, glue and let dry.


Be creative. You can use all kinds different colored flats, ribbon and all shapes and sizes for your embellishments. Just have fun with it!

DIY Shoes: Espada #3 Nelliel Tu-White Converse High Tops

Materials:

White High Top Converse
Pencil 
Fabric Paint 3D (I call it puffy paint)
Colors used:


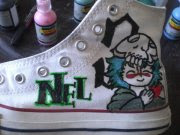
My friends in college got me into Bleach and I love cartoons. I'll be a kid forever regardless of what people say. I bought a pair of converse and I hardly wore them because they made me look short :(. But after I painted on them I didn't care anymore because I was the one who had shoes that look like these. Lol. So I choose Nel, if any of you are fimilar with Bleach Nel showed up in a few episode and they cracked me up, I was laughing so hard I was about to cry (Maybe I'm just lame and easy to make laugh, but anyone who's watched it has to agree with me a little bit).

Start with drawing the image with a pencil. 


Then do all the boarders with black fabric paint. 


Let dry and fill in with colors as desired. 


I really like fold down converse but I was never get myself to buy them. So I folded the tongue down and drew a 3 on it (Which is Nel's number, for all who don't know). 


Bottom outside facing surfaces contain the image and the inside just contains green scribbles and Nel's name.

Pick you favorite cartoon character and get started on your own. The ideas are endless. If you can imagine it, you can do it! :)